
 DeltaSnap
 DriveSync
 Noject
 DeltaSync

If you use VMware Fusion on an Apple Silicon Mac and have moved to macOS 27, Fusion may not start for you, or may crash while you set up a VM. This guide covers where Fusion stands on macOS 27 and how to move your VMs to MacVisor, our VM app for Apple Silicon Macs. For a feature-by-feature view, see MacVisor vs. VMware Fusion.
Where Fusion stands on macOS 27
As of 17 November 2026:
- No macOS 27 support statement. Fusion's current release is 26H1u1, from 3 September 2026, which came out before macOS 27. Its release notes and system requirements don't mention macOS 27, and Broadcom hasn't said when a release for it will come.
- Crashes reproduced by Broadcom staff. In Broadcom's community forum, Broadcom employees reproduced two macOS 27 crashes in October: one that stops Fusion starting on a Mac whose language isn't English, and one in Fusion's toolbar on macOS 27.2, for which a bug was logged. Users there report workarounds, which don't help everyone.
- No fix shipped. No Fusion update has followed.
A thread started by a moderator of that forum puts it in its title: "Fusion on macOS 27: DON'T. At least for now."
If Fusion works for you, or your Mac can stay on macOS 26, you don't have to move. Fusion is free, and it's mature. If you need macOS 27 and your VMs, read on.
What comes across
What you can do depends on the guest:
| Your Fusion VM | In MacVisor |
|---|---|
| Linux or FreeBSD (Arm) | Import it: its disks converted to ASIF, with its name, CPUs, memory and MAC address |
| Windows 11 on Arm | Make a new Windows 11 VM from Microsoft's ISO, then copy your files |
| macOS | Make a new macOS VM from Apple's installer, then copy your files |
| Any x86 VM from an Intel Mac | Doesn't run on Apple Silicon, in Fusion or MacVisor |
Linux VMs: import them
MacVisor 27.2.1 and later import Arm Linux and FreeBSD VMs from Fusion. A VM with snapshots comes across in its current state, without them.
- Shut the VM down in VMware Fusion, not suspended. A suspended or encrypted VM is refused. If Fusion won't start on macOS 27, a VM you shut down before upgrading imports as it is.
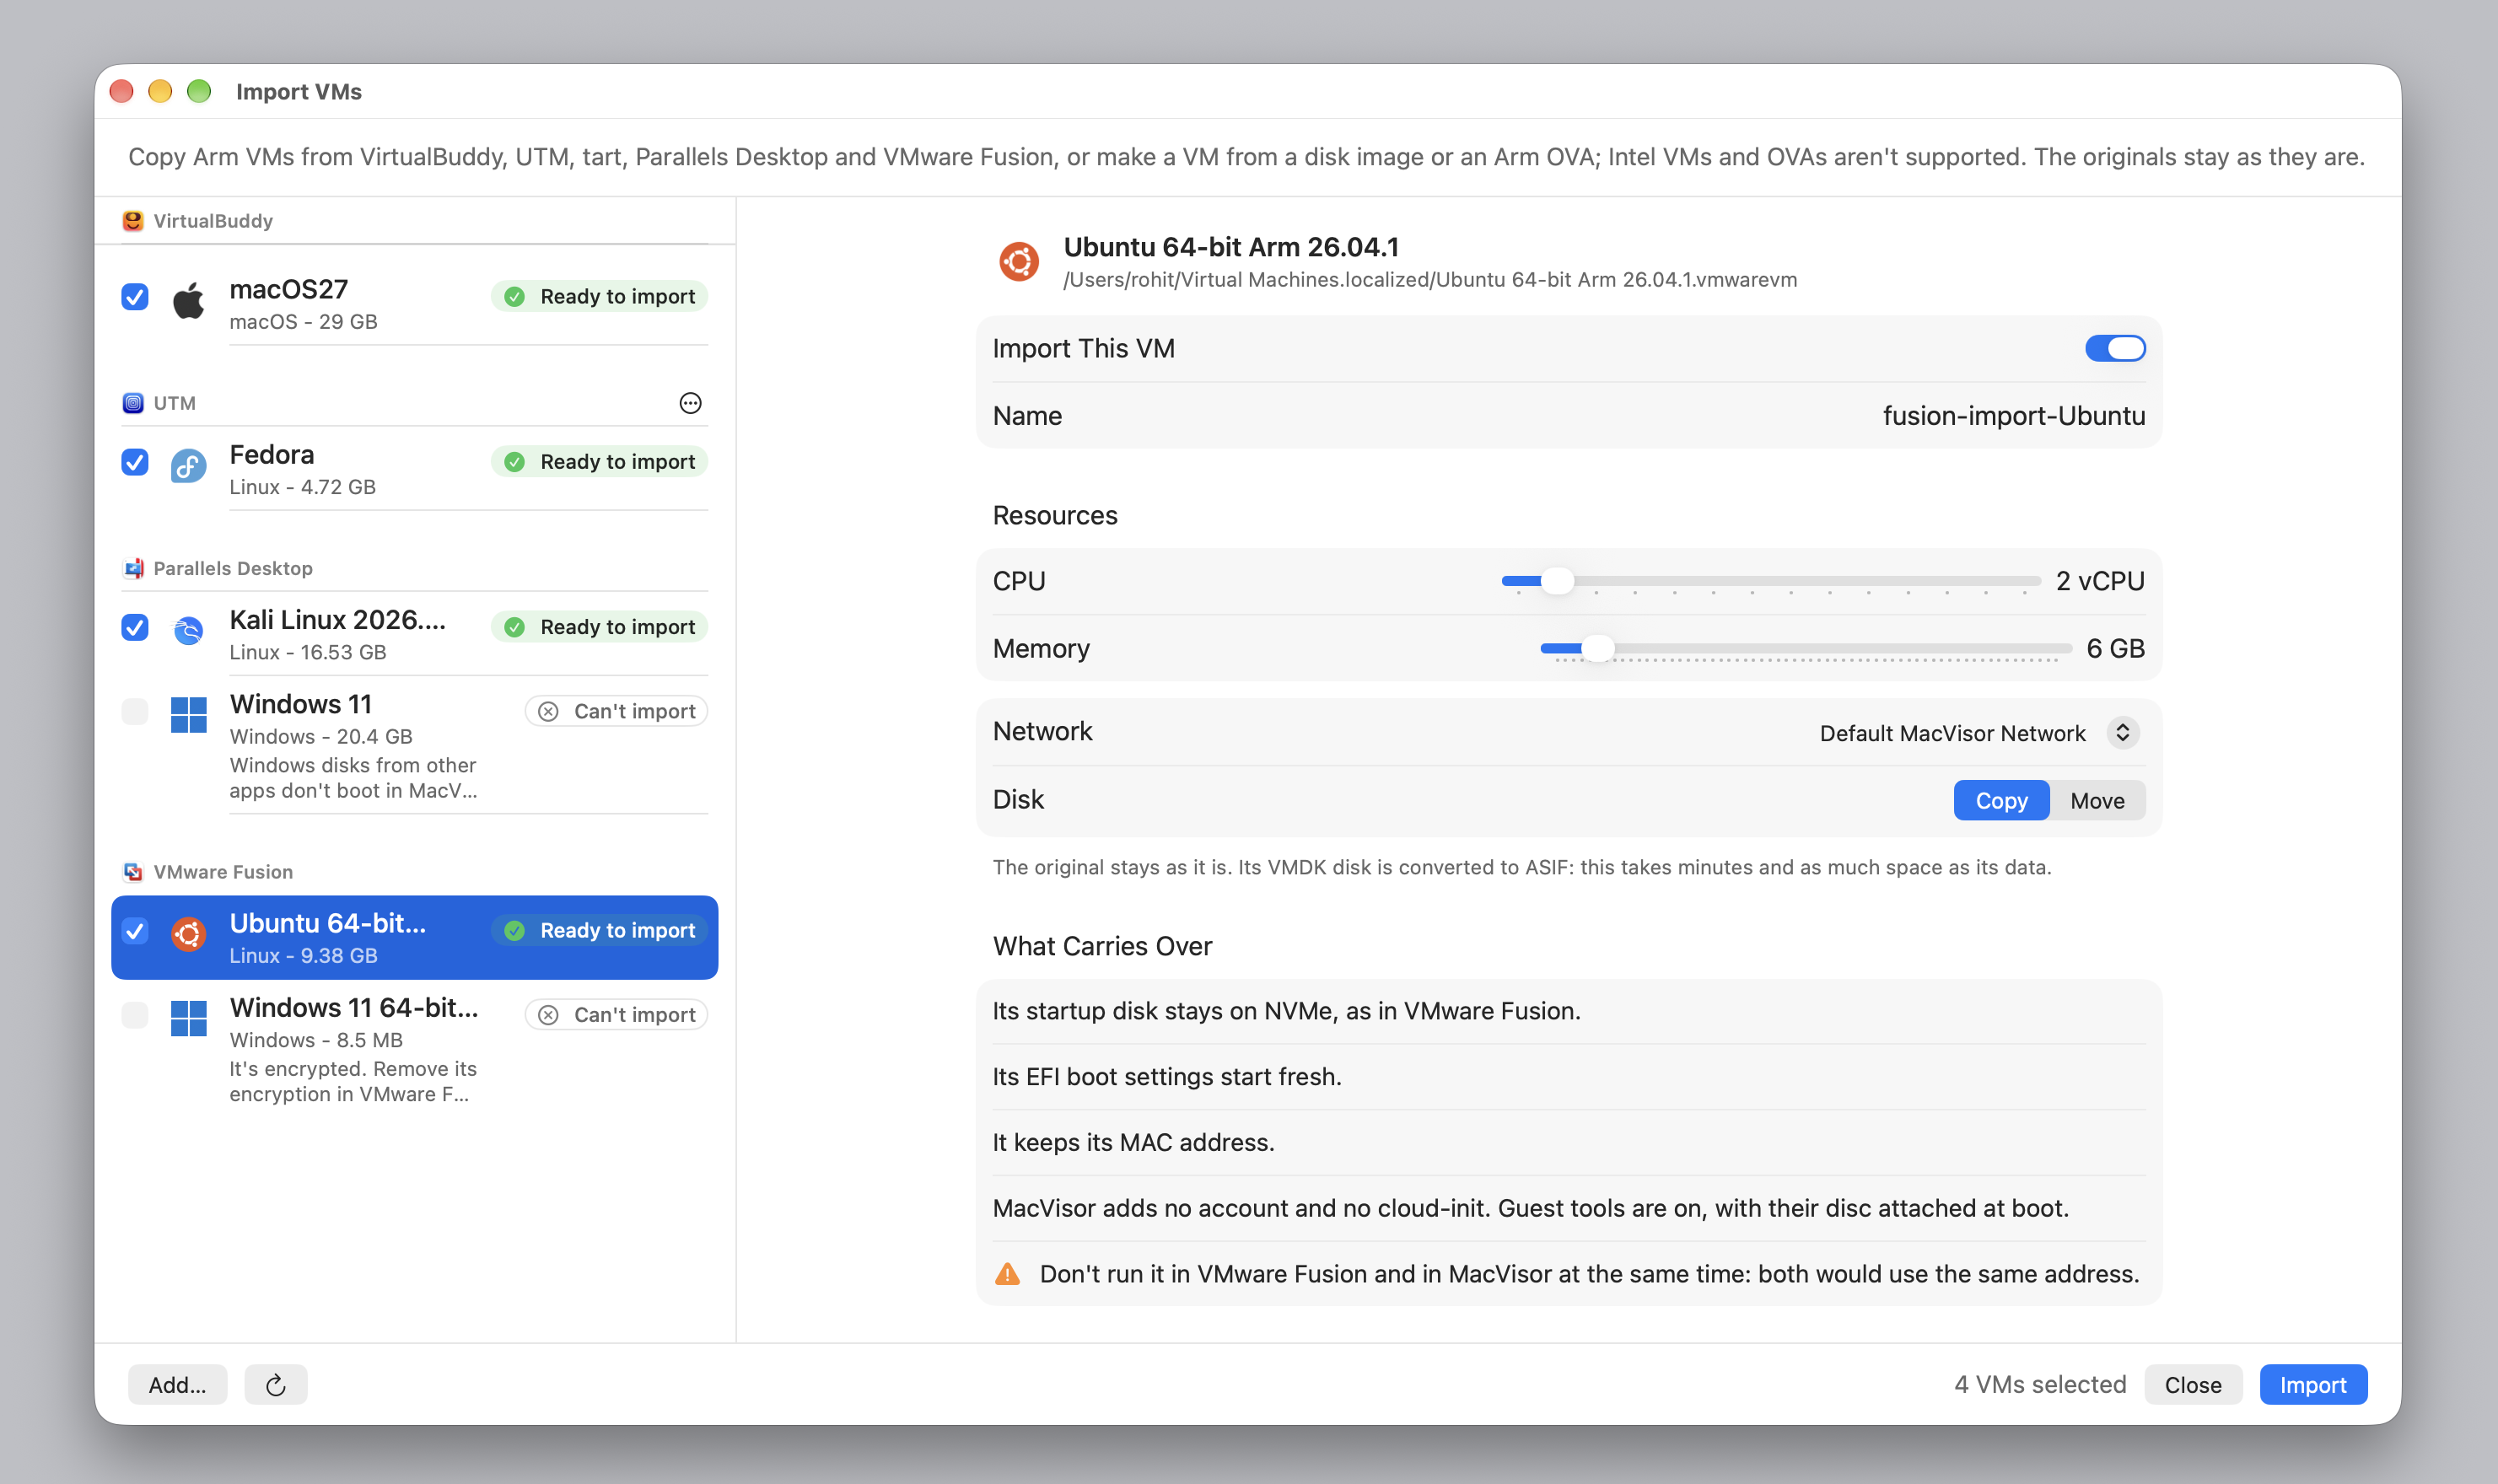
- In MacVisor, choose File → Import… (⇧⌘I). It lists the VMs in Fusion's folder,
~/Virtual Machines.localized, each marked Ready to import or Can't import, with the reason. Add… or a drop takes a.vmwarevmfrom anywhere else. - Tick the VM, check its name, network, CPUs and memory, and choose Copy or Move. Both convert the disks to ASIF, which takes minutes. Copy leaves the original working in Fusion. Move sends it to the Trash once the new disks read back as the originals do.
- Click Import. When it's done, MacVisor asks whether to start the VM.
From Terminal:
mvz import --scan                                                  # lists Fusion's VMs
mvz import ~/Virtual\ Machines.localized/Ubuntu.vmwarevm --name ubuntu
A loose .vmdk disk or an Arm OVA becomes a VM of its own the same way.
Check three things in the guest:
- The network adapter gets a new name, such as
enp0s1where it wasens160. The MAC address comes across, so a desktop guest keeps its address, but a server whose network settings nameens160may get none. See No network after importing. - It boots from its EFI fallback loader,
EFI/BOOT/BOOTAA64.EFI. If it stops at the firmware with no boot device, runsudo grub-install --removablein Fusion and import it again. - SATA and SCSI disks become Virtio disks,
/dev/vdaand on. An/etc/fstabthat names/dev/sda1needs UUIDs. A startup disk on NVMe stays on NVMe.
Then start the VM, sign in with the account it had in Fusion, and install the MacVisor Agent for shells, the clipboard, file transfer, port forwarding and a clean shutdown. The guest tools disc is attached at each start:
sudo mount -o ro -L MACVISOR_AGENT /mnt && sudo sh /mnt/install-linux.shRemove VMware Tools (open-vm-tools) when convenient: they have nothing to talk to. Take a snapshot once the VM runs as it should, with mvz snapshots take ubuntu --name "Imported". See VMware Fusion in the import docs.
If the VM is a dev box you rebuild from scripts anyway, a new one from MacVisor's cloud images may be simpler. It comes up with your account, SSH keys, the MacVisor Agent and, if you want, a container runtime and your home folder shared:
mvz create ubuntu dev --runtime containerd --homeSee Linux VMs on Apple Silicon Macs for the distributions in the catalogue.
Windows VMs: make a new one
MacVisor installs Windows its own way, with drivers for its own virtual hardware, so a Windows disk from Fusion doesn't boot in it. Make a new VM and move your files.
-
Copy your files out of the Fusion VM. Fusion's Windows 11 on Arm VMs have no shared folders on Apple Silicon, so use a network share, a cloud drive or a USB drive.
-
Download Microsoft's Windows 11 on ARM ISO, the multi-edition Arm64 one, in your language. The link expires after 24 hours.
-
Create the VM. In MacVisor, press ⌘N, choose Windows, pick the ISO and click Create & Install. Or in Terminal:
mvz create ~/Downloads/Win11_26H2_English_Arm64.iso win11 --ssh mvz wait win11 --start mvz open win11 -
Wait about 10 minutes. The install runs with no clicks and sets up your account, Remote Desktop, sound and the MacVisor Agent.
-
Activate Windows with your license. MacVisor doesn't include, sell or activate Windows.
-
Copy your files in through the
Z:drive, which is a shared folder on the Mac.
New Windows VMs have UEFI Secure Boot and a TPM 2.0, so Windows 11's own checks pass with nothing bypassed. BitLocker unlocks from the TPM, which is sealed to your Mac's Secure Enclave. See TPM and Secure Boot and Windows 11 on Apple Silicon Macs.
macOS VMs: make a new one
Fusion doesn't run macOS guests on Apple Silicon, so a macOS VM you had in Fusion came from an Intel Mac, and an Intel Mac's VM can't run on Apple Silicon. Make a new one from Apple's installer, with ⌘N or:
mvz create macos-27 mac --sshOn macOS 27, MacVisor sets the guest up without Setup Assistant, with your account, SSH and the MacVisor Agent. To bring files across, share a folder on the Mac with the new VM in VM Settings > Shared Folders and copy them into it. Apple allows two macOS VMs running at a time on a Mac, in any app. See macOS virtual machines on Apple Silicon.
What MacVisor adds
Fusion is a desktop hypervisor. MacVisor runs VMs more like a server does, and all of this is in every license.
-
An always-on host. A background service runs each VM in its own process and keeps it running when the app is closed. VMs can start at login without a window, and high availability restarts one that crashes:
mvz autostart dev onandmvz ha dev on. See High availability. -
Networks with a firewall. Named shared and host-only networks, VLANs, DHCP reservations and port forwards, with allow and deny rules the Mac enforces outside the guest. Fusion has custom networks but no firewall rules. See Firewall.
mvz networks create lab mvz set dev --network lab mvz networks firewall lab on --outbound deny --allow out:tcp:443 --allow out:udp:53 -
Backups. Daily or weekly backups to another drive or a network share, running VMs included, checked by SHA-256 and restorable on any Mac:
mvz set dev --backup-to /Volumes/T7/Backups --backup-at 22:30. Fusion's AutoProtect snapshots stay inside the VM. See Backups. -
Snapshots. Live snapshots with memory, disk-only ones, and automatic ones every hour, day or week:
mvz snapshots take dev --name before-upgrade, ormvz set dev --auto-snapshots daily. -
The mvz CLI. Nearly everything the app does, with
--jsonoutput, over the same VMs as the app. See the CLI reference.
It also runs macOS guests, Linux VMs from cloud images or OCI registries, and AI sandboxes for coding agents (a Tech Preview).
What Fusion does that MacVisor doesn't
- 3D graphics in Windows and Linux. Fusion gives Windows 11 on Arm DirectX 11 and Arm Linux OpenGL 4.3. MacVisor's Windows and Linux guests have no GPU acceleration, so Windows draws with the Mac's CPU. For games or 3D apps in Windows, MacVisor is the wrong tool.
- x86 guests on Intel Macs. Fusion runs x86 Windows and Linux on an Intel Mac. MacVisor runs only on Apple Silicon, with ARM64 guests. On Apple Silicon neither app runs x86 Windows; Windows 11 on ARM runs x86 and x64 apps with its own emulation, and in MacVisor's Linux VMs Rosetta runs x86-64 programs.
- Earlier macOS on the Mac. MacVisor needs macOS 27.
- VMware's tooling. The vmrest REST API, Packer and Vagrant plugins, connections to ESX hosts, and per-adapter bandwidth, packet-loss and latency simulation.
- Price. Fusion is free. MacVisor 27 Pro is a one-time license.
Try it
MacVisor's free 30-day trial has every single-Mac feature and needs no card. Download MacVisor, move one Linux VM or make a new Windows VM, and keep Fusion's copy until you're happy with the new one.