
 DeltaSnap
  DriveSync
  Noject
  DeltaSync

Yes. That is exactly what this feature is for.
DeltaSnap takes snapshots of an APFS volume, not an individual folder. If you want to keep a long history of important documents, but only a short history of everything else on your Mac, you can put those documents on a separate APFS volume.
Most people do not need to do this. You can use DeltaSnap with your existing Data volume and never touch the + button. Creating another volume is an optional feature for people who want more control over what their snapshots cover and how long they are kept.
Before we explain why it can be useful, there is one important thing to understand about mount points.
Your existing Documents were not deleted
Imagine that /Users/me/Documents already contains Taxes.pdf and Notes.md. You create a new APFS volume and choose that Documents folder as its mount point.
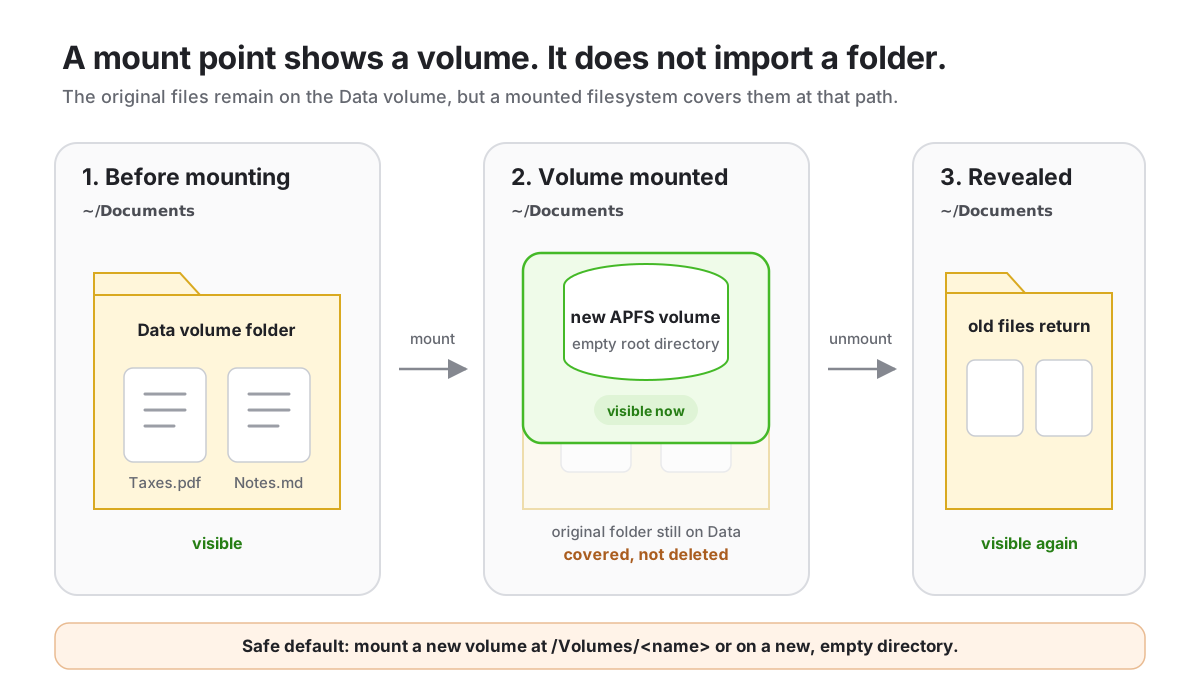
The path /Users/me/Documents now shows the new volume. Since the new volume is empty, the folder looks empty too.
Your original files are still on the Data volume. They are simply hidden behind the newly mounted volume. If you unmount the new volume in Disk Utility, the old contents of Documents will appear again.
Think of the folder path as a doorway. Once another volume is mounted there, the doorway leads to that volume. It no longer shows the folder that was there before.
Why would I create another volume?
Your Mac's Data volume contains almost everything you use. That includes your documents, applications, downloads, caches, developer builds, virtual machines, and many files that macOS changes in the background.
An APFS snapshot covers that whole volume. It does not matter if you only care about one folder. Changes elsewhere on the same volume can still make snapshots use more disk space.
A new snapshot initially shares storage with your live files. When a file is changed or deleted later, APFS may need to keep its old data so the snapshot can still show the earlier version.
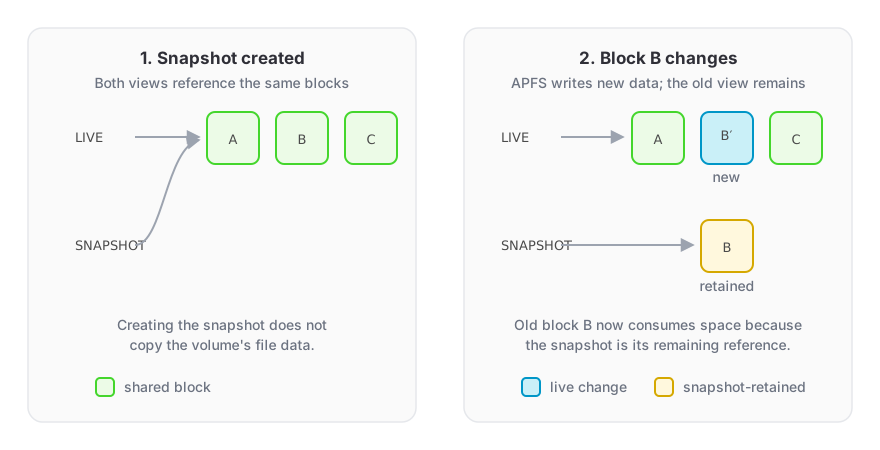
This is why snapshots of a busy volume can grow. On some of our development Macs, Data volume snapshots have held around 100 GB in less than a week. Those Macs build software and run virtual machines, so they produce far more changes than a typical Mac. During the same period, our important office and personal documents may change by only a few gigabytes.
Putting those documents on their own volume lets us use two different policies:
- Keep a shorter snapshot history for the busy Data volume.
- Keep hourly, daily, weekly, and monthly history for the smaller documents volume.
This is the main benefit. The documents volume has its own snapshots, its own schedule, and its own retention settings. Activity elsewhere on the Mac does not become part of that volume's history.
Creating the second volume alone will not reduce the space used by existing Data volume snapshots. To get the benefit, you also need to choose a shorter schedule or retention period for the Data volume.
Does a new volume divide my disk into fixed parts?
No. APFS volumes in the same container normally share the available disk space. Each volume can grow as it needs more room. This is different from creating old-style fixed partitions.
In simple terms:
- The APFS container is the shared pool of disk space.
- An APFS volume is a separate filesystem that uses space from that pool.
- A folder lives inside one of those volumes.
- A snapshot belongs to one volume.
DeltaSnap also offers optional Reserve and Quota settings when you create a volume. A reserve keeps a minimum amount of space available for that volume. A quota limits how much it can use. Leave both empty unless you know you need them.
Apple's Disk Utility guide explains how APFS volumes share space.
A safe way to create your first volume
Start with a small test. There is no need to move your whole Documents folder on day one.
- Make sure your important files have a separate backup.
- In DeltaSnap's sidebar, find the APFS container where you want the new volume.
- Select the + button and give the volume a clear name, such as
ImportantDocs. - Leave Mount Point empty. macOS will use
/Volumes/ImportantDocs. - Leave Reserve and Quota empty for now.
- Copy a few test files into the new volume. Keep the originals until you have checked the copies and your backup.
- Create a snapshot and make sure you can browse the files in DeltaSnap.
- Set the snapshot schedule you want for this volume.
Once you are comfortable with it, you can move more of your important data onto the new volume.
If you prefer a location inside your home folder, create a new empty folder such as /Users/me/VersionedDocuments and use that as the mount point. Using the normal /Volumes/ImportantDocs location is simpler and less likely to surprise you.
Should I mount it at ~/Documents?
We do not recommend doing that as your first setup.
Using the familiar Documents path requires a careful migration. You first need to copy and verify your files on the new volume, keep a backup of the original folder, and make sure the mount point is empty before mounting the volume there.
There is another complication. macOS may sync Desktop and Documents through iCloud Drive. Changing where Documents is stored can affect that setup. If you use iCloud Desktop and Documents, keep the new volume at its default location unless you have tested the full workflow and understand how syncing will behave. Our guide to cloud-synced and app data explains why this needs care.
For most users, a separate ImportantDocs or VersionedDocuments location is the safer choice.
What happens to snapshots of the Data volume?
Once ImportantDocs is a separate mounted volume, a snapshot of the Data volume does not include the files inside ImportantDocs. Those files belong to their own volume, even if its mount point appears somewhere inside your home folder.
This means you should configure DeltaSnap for both volumes if you want history for both. It also means your backup must cover both volumes. APFS snapshots live on the same disk as the files, so they cannot protect you from disk failure, theft, or erasing the container.
How this compares with ZFS
For readers who know ZFS, an APFS container is roughly like a storage pool, while an APFS volume is closest to a ZFS filesystem dataset. Each filesystem has its own mount point and snapshots.
The comparison is not exact. ZFS datasets can form a hierarchy and support recursive snapshots. APFS volumes in a container are separate volumes, and DeltaSnap manages them one at a time. The basic reason for creating them is similar: choose a useful filesystem boundary, then apply the right snapshot policy to it.
You can read more in the OpenZFS snapshot documentation.
Is this feature right for me?
Consider a separate volume if:
- A small set of important files needs a longer history than the rest of your Mac.
- Your Data volume changes heavily because of builds, virtual machines, or other large workloads.
- You want a separate encrypted or case-sensitive filesystem.
- The important files already live on an external APFS volume.
Keep using the existing Data volume if:
- You want the simplest setup.
- You mainly want short-term protection across the whole Mac.
- Your files depend heavily on iCloud Desktop and Documents.
- You do not want to manage and back up another volume.
The simple rule
A separate APFS volume gives a group of files its own snapshot history and retention policy. It does not turn an existing folder into a volume, and it does not move the folder's files for you.
Create the volume at its default location, or mount it on a new empty folder. Copy your data carefully, verify it, and keep an independent backup.